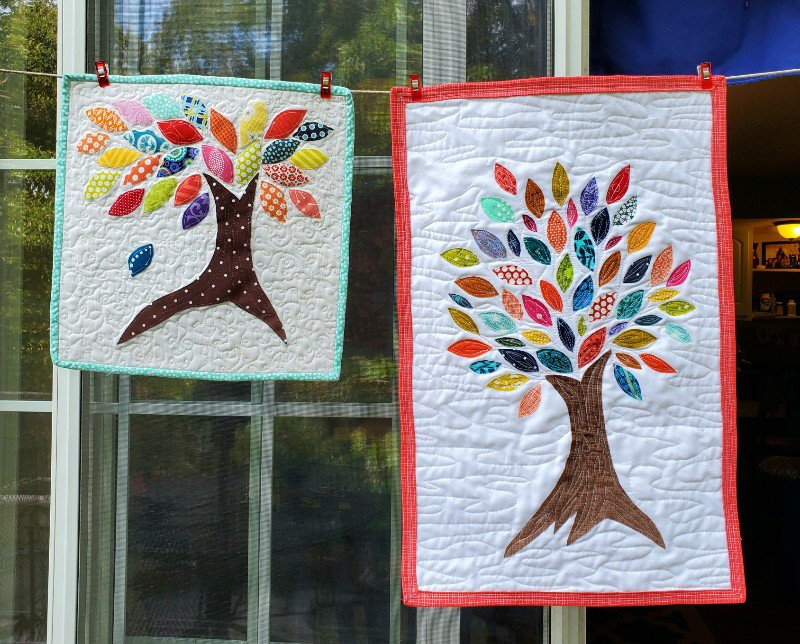
This is a fun, easy, and quick little mini quilt, perfect for using up some of those fabric scraps!
You will need:
- Assorted scraps
- some background fabric
- Pellon Lite-EZ Steam II or other two-sided lightweight fusible web
- sharp scissors
- batting
- backing
- binding

Now, you can absolutely make a template and draw a perfect tree and leaves if that is what works for you but I didn’t do that. This project really is a great opportunity to practice a little improv and exercise that right brain. 😀
Make sure your background and tree fabrics are pressed to start but don’t worry about your scraps.
First, roughly draw out your tree on the paper side of the EZ-Steam. Don’t worry too much about how perfect your drawing lines are. When you cut, the scissors will naturally work out a smooth line and you can trim what isn’t. And even though it looks not so great on the paper, it’s exactly the tree I cut out in the photo above and it turned out pretty cool.

Cut out your tree roughly. You’re going to adhere this to fabric and cut it out again and you’ll get more precise during this step.

Gently and carefully peel off one side of the paper and adhere your tree to the wrong side of your tree fabric. No ironing – we’ll do that at the end when our design is done.

And now cut it out.

Here it is with the back peeled off – a nice fabric sticker tree.

Now, position your tree on your backing fabric wherever you want it. Press down to adhere when you’re sure it’s good!

Now, cut little leaves out of your EZ-Steam. Again, you’ll be cutting again once you adhere them to the fabric so don’t worry about cutting them out of the EZ-Steam too neatly.

Add to fabric just like you did for the tree.

Cut out and clean up the rough edges. Place them around your tree but don’t peel the backing until you like your arrangement.

Once you like how it looks, peel your labels and stick away.

And then press to really adhere them for good. Ignore my iron. It is ugly and my good one died. I really need a new one but not sure yet what to get. Suggestions?

Once everything is nicely adhered, it’s time to make your quilt sandwich and baste.
Remember, cut your batting a little bigger than your top and your backing a little bigger than that. Doesn’t have to be perfect because you will be trimming it down once you finishing quilting.
Remember that fabric that you loved when you bought it but now not so much and you’re not sure what to do with it? That will make a good mini quilt back. At least, that’s what I do!
You can use spray or pins or whatever works for you. I like pins. Don’t pin your applique pieces. This is small enough that you don’t need to go crazy and we’re going to be focusing on appliqueing all the pieces down first.

Time to quilt. And here’s where again, you can take your time and go around each leaf like I did for this smaller tree.

Or, you can free motion and get creative. I love how this turned out. I went quickly and went up and around the leaves three times: once for the center and twice more going around the edges. If this will get washed a lot, play close attention to get close to all your leaf and tree edges to prevent fraying but the EZ-Steam really helps with that, too.

I love how the lines between the leaves almost look like branches.

And then I just did some random up and down on the tree.

Finally, I did the background in a kind of horizontal stipple. Once you’re done quilting, trim and square up (make sure you’ve cut your sides, top, and bottom in an even square or rectangle).

My binding strips are 2.5 inches. I sewed my binding to the back instead of the front so I could do machine binding. I also trimmed close because I want the binding on the front a little wider than on the back, kind of like a frame.

I folded it to the front and lightly glue basted it in place. Just add a tiny bit of glue and press.


I’m not super good at machine binding yet and here I do get frustrated when my lines are not straight and perfect. So rather than freak out and pull stitches when my binding wasn’t perfect, I decided to make it “folksy” like my leaves. 😉 I went around the binding three times.

And here it is! I think it turned out really cute!

If you make one, I’d love to see it! Post it using #fourrobbinsscrapbuster so I can find you!

Shop related items:


