“Hey there! I’ve updated this post with some new tips and ideas to make it even better. If you’ve visited before, take a look at the fresh updates and let me know what you think!
I came across an ad the other day in a craft magazine for these cute little muslin bags for Valentine’s Day. They were so cheap, I thought, “They’ve gotta be super easy to make!” So, I decided to give it a try. Turns out, they really are quick and simple to whip up. The best part about making them yourself is you get to use better quality fabric and add your own personal touches, like embellishments. I did use a sewing machine, but honestly, you can totally hand stitch these bags if you prefer. I’ve included links to the supplies I used and recommend throughout the post. Just a heads-up, those are affiliate links, so I might earn a small commission if you decide to make a purchase, at no extra cost to you!


Getting Started
The first thing you want to do is to prepare your fabric. For this bag, my fabric measures 5-1/2 inches wide by 14 inches long. I’m using Kona Snow but you could use muslin or novelty fabrics or whatever you like. First, I like to go ahead a press approximately 1/4 inch in on each side to the wrong side of the fabric so I know where my seam is going and I know how much room I have to play around with applique, embroidery or whatever else I want to do.

Next, fold the top down 1/2 inch. Press and then fold down another 1/2 inch. Then fold in half, wrong sides together, and press your bottom seam.

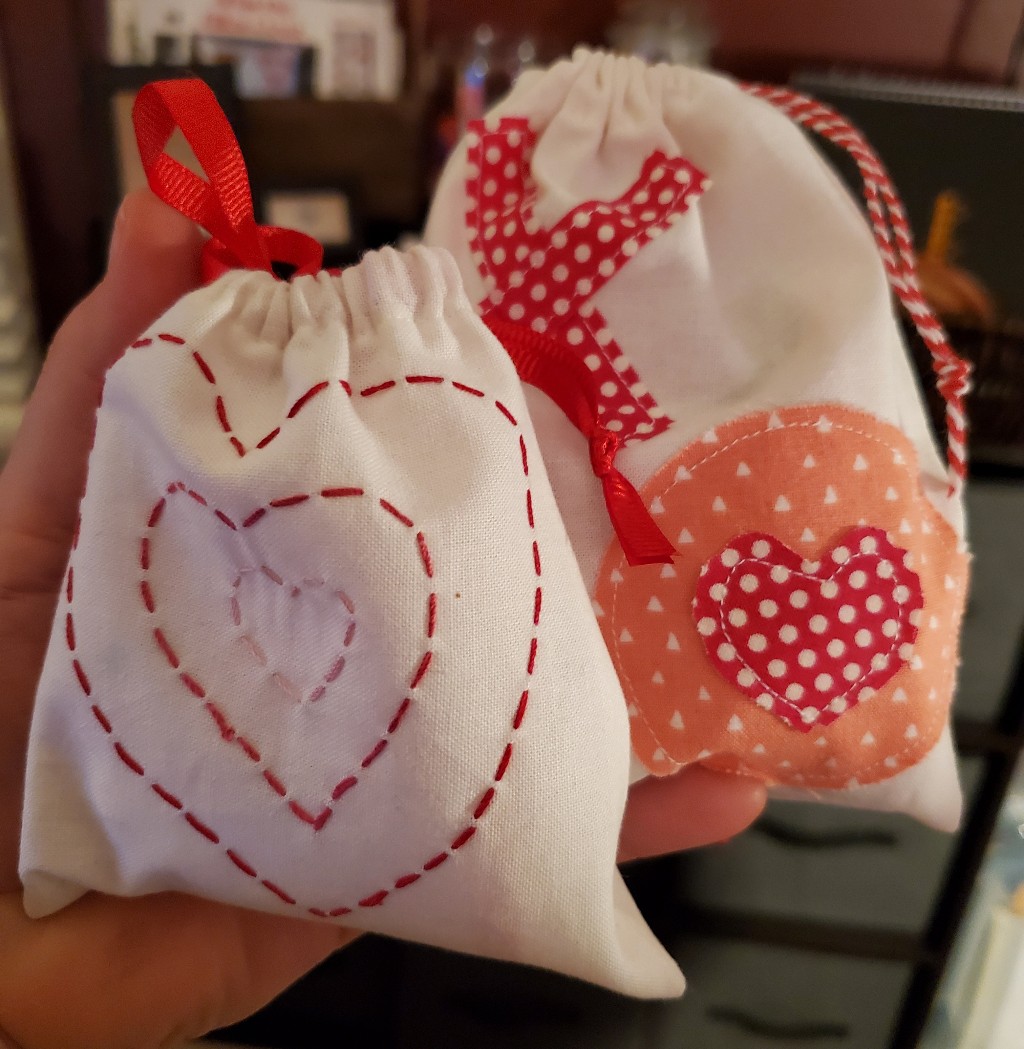
Embellish Your Bag!
For this bag, I decided to do some applique. First, I cut out a 2-inch circle. I like to take just a tiny bit of invisible Elmer’s glue on my finger and apply it to a few spots on the back of the applique piece and then press with a hot iron. That way my shape stays in place while I stitch and I don’t have to mess with pins. Stitch around the edge. Note: Make sure your seam allowance is open and does not get caught in your stitching.
Next, I cut out a little heart and repeated the glue, pressing, and stitching.

I cut out strips to make an X. I did my glue and press with the first strip and then the second and then I stitched into place. Again, be sure your seam allowance is open and doesn’t get caught in your stitching!

Assemble Your Bag
Stitch up each side using 1/4″ seam allowance back stitching at the top and bottom. Stop approximately 1 inch below the bottom pressed seam line so your top tubes don’t get caught in your seam. Backstitch athe pressed top seam. Clip bottom corners.

Press side seams open. Press your top tube down again .

Finally, turn right side out. Stitch along the bottom edge of each top fold to create a tube in front and in back to place your ties.

Finish the Bag
Using a pin to secure the end of the ribbon or cord. Feed one end of your ribbon into the tube and out the other side and then into the second tube and out the other side so that your ends are both coming out of the same side of the bag. You are basically making a U with the ribbon, with both ends coming out on the same side.

Tie ends together. Repeat with cord or ribbon going the opposite direction.


Have Fun and Add Your Own Style
These little bags are perfect for party favors and Valentine’s treats! You could even use them as part of a table setting, with personalized names on each one and little surprises tucked inside. Another fun idea is to use them for Advent gifts, just add numbers to the bags. I’ve put together a cute assortment using different fabrics and ties (like ribbon, cord, and twine), and I love how versatile they can be!

Finally, I embroidered this bag with some cute hearts. This bag starting fabric measurement was 5 inches wide x 11 inches long. I used a water soluble marker to draw my hearts and 12 weight Sulky thread for the stitched hearts.

I hope you’ve enjoyed this tutorial! These little bags are seriously quick and fun to make, and I’m already working on a few more myself! Ready to dive in? Check out my recommended products and get started on your next project today!
Krista


Leave a Reply